使用 Partition explainer 解释 ResNet50
此 notebook 演示了如何使用 SHAP 解释图像分类模型。在此示例中,我们解释了 ResNet50 模型将图像分类为 1000 个 ImageNet 类别的输出。
[1]:
import json

from tensorflow.keras.applications.resnet50 import ResNet50, preprocess_input

import shap
加载模型和数据
[2]:
# load pre-trained model and data
model = ResNet50(weights="imagenet")
X, y = shap.datasets.imagenet50()
[3]:
# getting ImageNet 1000 class names
url = "https://s3.amazonaws.com/deep-learning-models/image-models/imagenet_class_index.json"
with open(shap.datasets.cache(url)) as file:
    class_names = [v[1] for v in json.load(file).values()]
# print("Number of ImageNet classes:", len(class_names))
# print("Class names:", class_names)
用于图像的 SHAP ResNet50 模型解释
构建 partition explainer,包含:- 模型(python 函数)- masker(python 函数)- 输出名称(输出类别的名称列表)
使用少量评估快速运行
[4]:
# python function to get model output; replace this function with your own model function.
def f(x):
    tmp = x.copy()
    preprocess_input(tmp)
    return model(tmp)


# define a masker that is used to mask out partitions of the input image.
masker = shap.maskers.Image("inpaint_telea", X[0].shape)

# create an explainer with model and image masker
explainer = shap.Explainer(f, masker, output_names=class_names)

# here we explain two images using 500 evaluations of the underlying model to estimate the SHAP values
shap_values = explainer(X[1:3], max_evals=100, batch_size=50, outputs=shap.Explanation.argsort.flip[:4])
Partition explainer: 3it [00:10, 3.37s/it]
Explainer 选项:
上面的图像 masker 使用了一种称为 “inpaint_telea” 的模糊技术。还有其他可用的 masking 选项可供实验,例如 “inpaint_ns” 和 “blur(kernel_xsize, kernel_xsize)”。
推荐的评估次数为 300-500 次,以便为超像素获得足够精细的解释。评估次数越多,粒度越高,但运行时间也会增加。
注意:
outputs=shap.Explanation.argsort.flip[:4]已在上面的代码中使用,用于获取 SHAP 值,因为我们想要获取每个图像最有可能的 4 个类别,即概率递减的前 4 个类别。因此,使用了翻转 argsort 切片 4。
可视化 SHAP 值输出
[5]:
# output with shap values
shap.image_plot(shap_values)
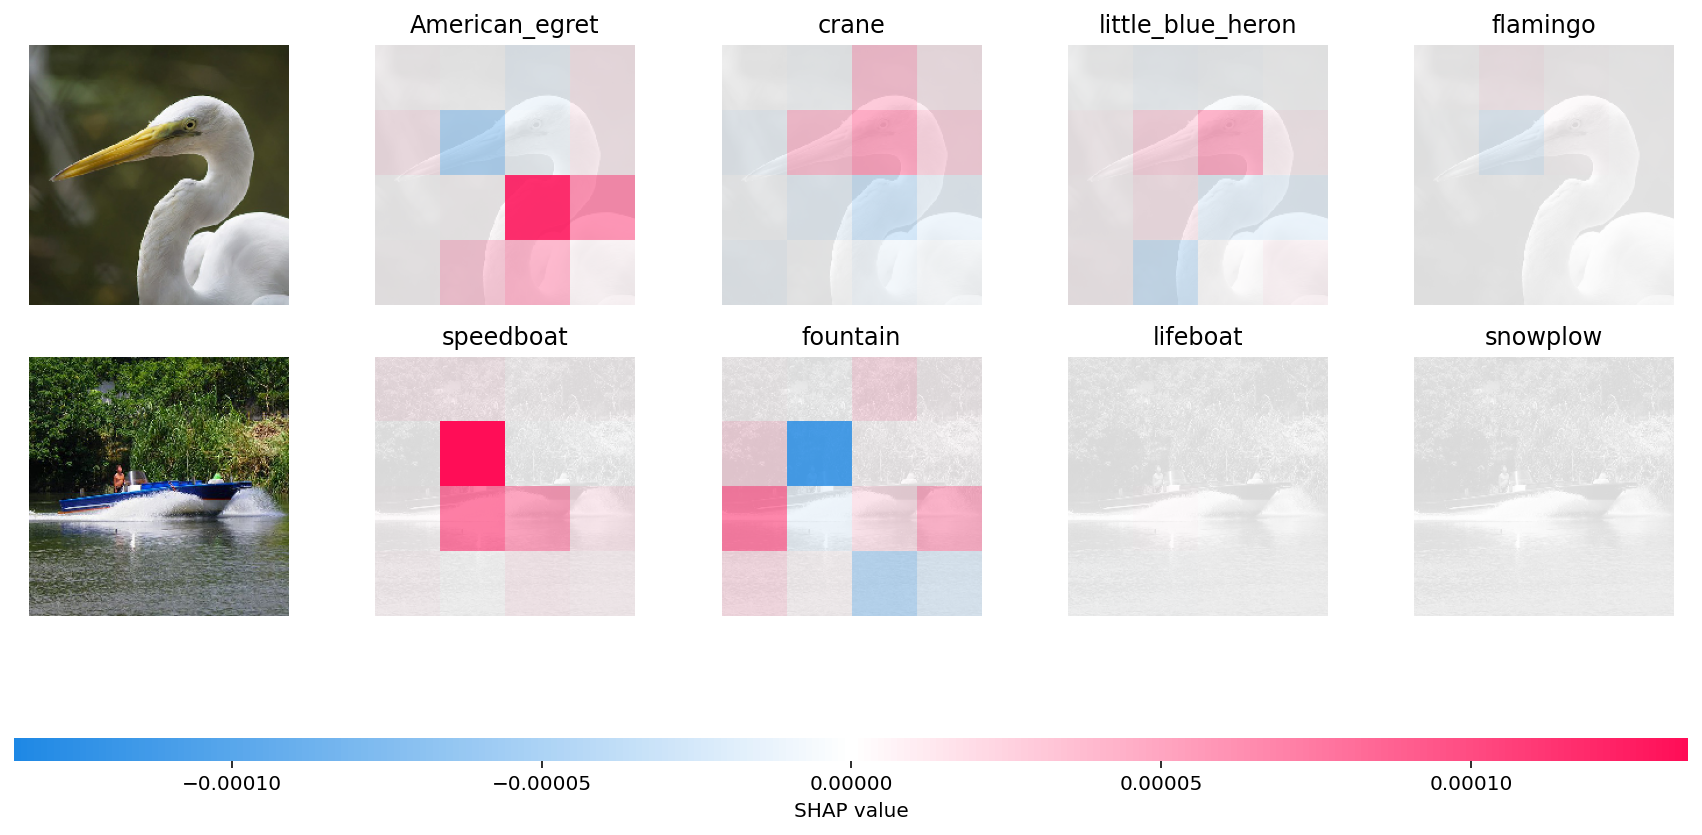
SHAP 输出解释的解读:
在第一个示例中,给定的鸟类图像被分类为美洲白鹭,接下来最有可能的类别是鹤、苍鹭和火烈鸟。正是鸟类颈部的“隆起”导致其被分类为美洲白鹭,而不是鹤、苍鹭或火烈鸟。您可以看到鸟类颈部区域在红色超像素中得到了适当的突出显示。
在第二个示例中,是船的形状导致其被分类为快艇,而不是喷泉、救生艇或扫雪机(在红色超像素中得到了适当的突出显示)。
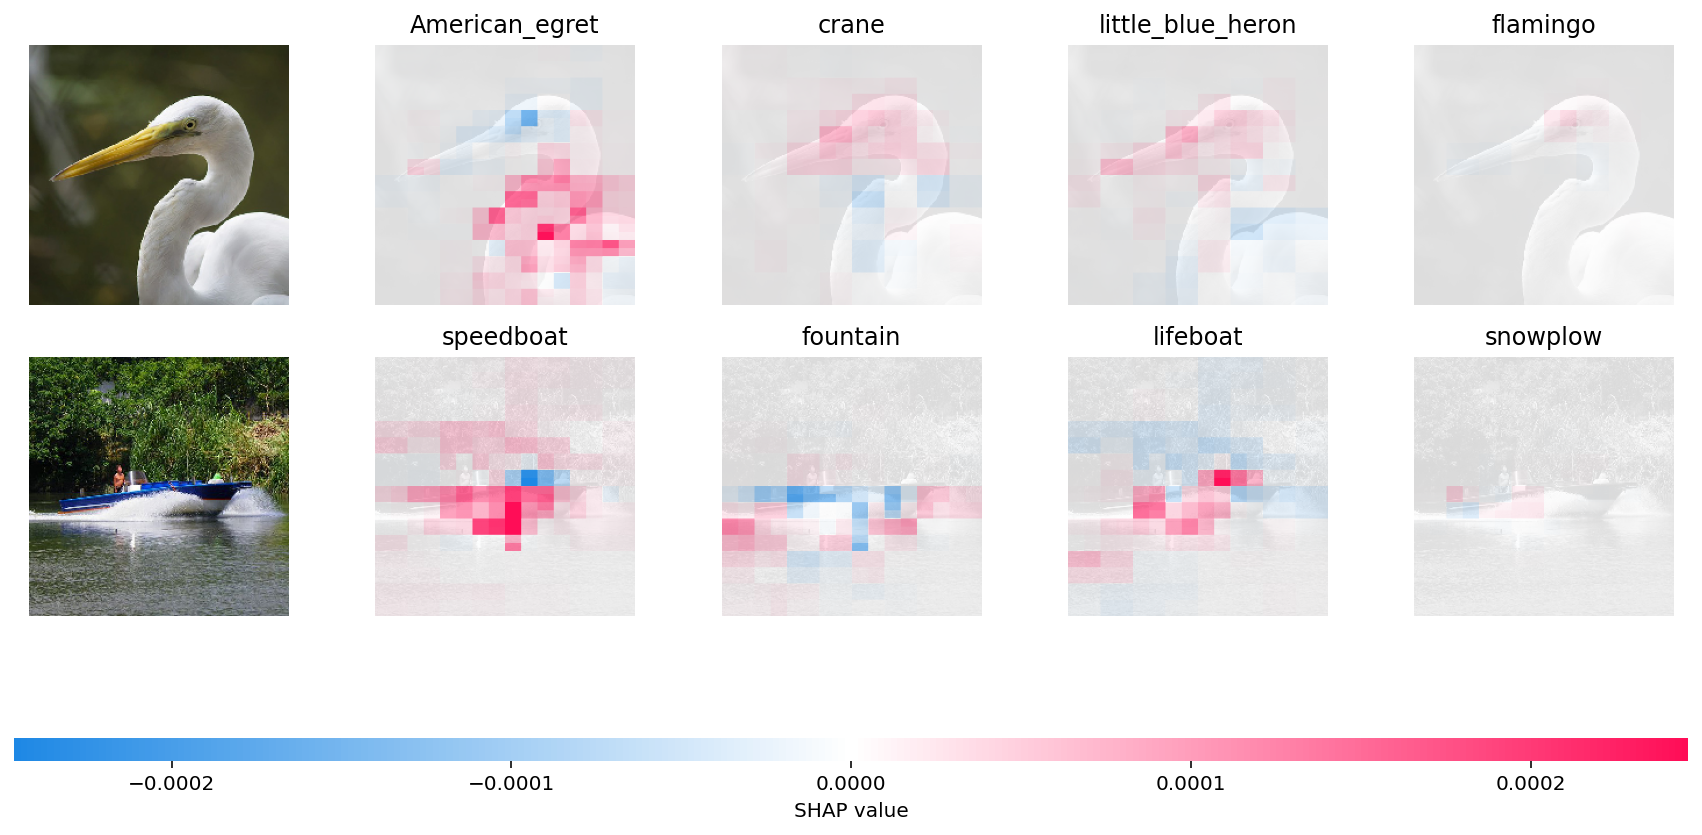
使用多次评估的更长时间运行
通过增加 max_evals 参数,我们让 SHAP 执行原始模型更多次,从而获得更精细的解释。我们还在此处使用模糊内核,既为了演示它,也因为它比 inpainting 快得多。请注意,如果您在系统上未使用现代 GPU,这将需要一段时间。
[6]:
# python function to get model output; replace this function with your own model function.
def f(x):
    tmp = x.copy()
    preprocess_input(tmp)
    return model(tmp)


# define a masker that is used to mask out partitions of the input image.
masker_blur = shap.maskers.Image("blur(128,128)", X[0].shape)

# create an explainer with model and image masker
explainer_blur = shap.Explainer(f, masker_blur, output_names=class_names)

# here we explain two images using 500 evaluations of the underlying model to estimate the SHAP values
shap_values_fine = explainer_blur(X[1:3], max_evals=5000, batch_size=50, outputs=shap.Explanation.argsort.flip[:4])
Partition explainer: 3it [00:17, 5.87s/it]
[7]:
# output with shap values
shap.image_plot(shap_values_fine)
有更多有用的示例的想法吗? 欢迎提交 Pull Request 来为此文档 notebook 添加内容!